en
 cn
 it
 es
 tr
 ja
 sv
 pt
 nl
 ru
 fr
 de
 pl

Serving global fashion brands
as the core supply chain of excellence, agility, and innovation.
as the core supply chain of excellence, agility, and innovation.
05 Nov 2026 / Industry
Accurate garment measurements are essential for maintaining fit and consistency from sample development to bulk production. Even small differences in measuring position or technique can lead to inconsistent inspection results, especially when several people are measuring the same style.
For apparel brands and manufacturers, garment measurement is not simply a matter of checking length and width. Each measurement needs a clearly defined reference point, measuring path, and recording method. These details should be agreed upon before sample approval and used consistently throughout production.
Body measurements describe the dimensions of a person's body. Garment measurements describe the actual dimensions of a finished or semi-finished garment.
The two are not interchangeable. A shirt with a 100 cm chest circumference, for example, does not necessarily fit someone with a 100 cm chest measurement. The difference depends on garment ease, fabric properties, construction, and the intended fit.
In manufacturing, measurements are usually organized as points of measure (POMs). Each POM identifies a specific dimension, such as half chest, body length, shoulder width, or sleeve length. The measurement chart should define where each measurement starts and ends, as well as how it is taken.
The apparel tech pack should include clear POM descriptions and, where necessary, diagrams showing the exact reference points and measuring paths.
Measurement results are only useful when the garment is prepared under consistent conditions. A garment that is stretched, folded unevenly, or measured before its agreed finishing process may produce misleading results.
Before measuring, confirm the following:
l Garment condition: Specify whether the garment should be measured before or after washing, pressing, or other finishing processes.
l Position: Lay the garment flat on a clean, level surface, with the fabric relaxed and free from folds.
l Closures and components: Follow the agreed instructions for zippers, buttons, belts, cuffs, and adjustable features.
l Equipment and units: Use a suitable measuring tape or ruler and record all measurements in the same unit.
Do not pull the fabric tight to make it lie flat. This is particularly important for lightweight woven fabrics and garments with elasticated sections that can stretch or shift during measurement.
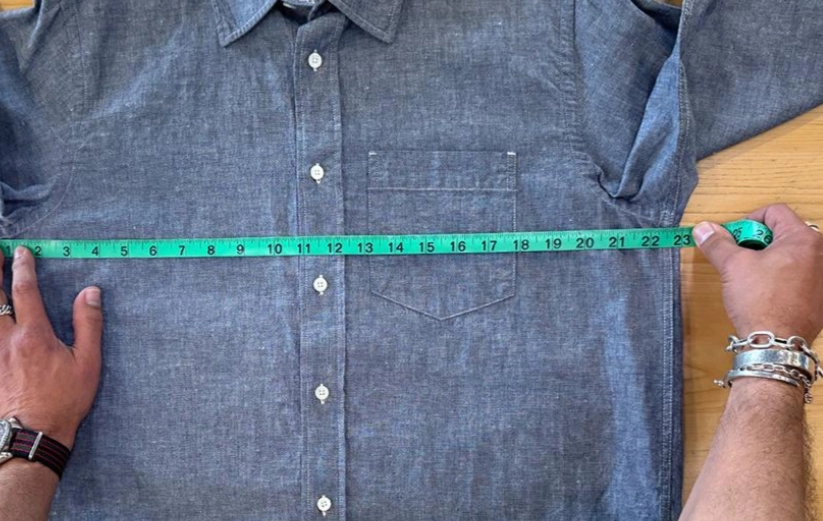
Measuring a shirt laid flat
A measurement chart should define every POM individually. The table below gives common examples for woven shirts and jackets. The measuring methods are illustrative; the approved style specification should determine the final reference points.
POM | Start and end points | Measuring path | Recording basis |
Half chest | From one side seam to the other at the defined chest level | Straight across the garment | Flat measurement |
Body length | From HPS to the front bottom edge in the example below | Parallel to the front center line | Flat measurement; collar excluded |
Shoulder width | Between the specified shoulder seam points | Straight across the back | Seam-to-seam measurement |
Sleeve length | From the shoulder/sleeve seam junction to the sleeve opening | Along the sleeve line | State whether cuff is included |
Armhole depth | From the specified shoulder reference to the underarm level | Vertically | Straight measurement |
Armhole seam length | Start at the underarm seam junction and return to the same point around the armhole | Along the armhole seam line | Full seam-line circumference for this example |
Collar length | Between the defined collar endpoints | Along the specified collar construction line | State the exact reference points |
For an illustrative buttoned woven shirt, half chest can be measured straight across from side seam to side seam, 2.5 cm below the underarm seam junctions, with the garment laid flat and relaxed. This position is specific to this example, not an industry-wide or KINGSRICH standard. The actual chest level must be confirmed in the style specification.
For the same example, body length can be measured from HPS (High Point Shoulder) to the front bottom edge, parallel to the front center line. HPS is the reference point at the top of the shoulder near the neckline. The collar is excluded from this body-length measurement. If a different style uses another starting point or measuring path, its specification should state that clearly.
For the set-in sleeve-length POM in this example, the starting point is the shoulder/sleeve seam junction. This reference applies to the sleeve measurement only; it does not replace HPS as the body-length starting point.
Collar measurements depend on collar construction. The tech pack should identify the endpoints and whether the measurement follows a seam, edge, or another defined line. A diagram is useful when the collar shape makes the reference points difficult to identify.
Sleeve length requires particular attention because different sleeve constructions use different reference points. A set-in sleeve, raglan sleeve, and dropped-shoulder sleeve should not automatically share the same measuring method.
For a set-in sleeve, the measurement commonly runs from the shoulder/sleeve seam junction to the sleeve opening. If the garment has a cuff, the specification must state whether the sleeve length ends at the cuff seam or includes the cuff itself.
A center-back sleeve measurement follows a different path. It starts at the center back neckline or another agreed back reference, continues over the shoulder, and follows the sleeve down to the opening. It is not a straight diagonal measurement from the back neck to the cuff.
Raglan sleeves need a defined neckline or raglan seam reference. Dropped-shoulder styles also require an agreed shoulder reference because the shoulder seam sits lower than on a conventional set-in sleeve. The measuring path should be documented for the specific construction.
Three armhole dimensions should be distinguished:
l Armhole depth: A straight vertical measurement between the specified shoulder reference and underarm level.
l Armhole seam length: The curved length measured along the seam where the sleeve joins the body.
l Armhole opening width: A straight measurement across the opening, if required by the style specification.
These measurements describe different dimensions and should not be used interchangeably. The POM chart should identify the required measurement and show its reference points.
A target measurement is the specified dimension for a garment. A tolerance defines the permitted variation from that target.
For example, if a woven shirt has a target half-chest measurement of 52.0 cm with an illustrative tolerance of ±0.5 cm, the acceptable range is 51.5–52.5 cm.
This example is for explanation only. It is not an industry-wide tolerance or a KINGSRICH production standard. Actual tolerances should be agreed for each style and POM, considering the fabric, construction, fit requirements, and inspection method.
A half-chest tolerance applies only to the half-chest measurement. It cannot be transferred directly to the full chest circumference. Measurement tolerance also differs from size grading: tolerance controls variation within a specified size, while grading defines how measurements change between sizes.
A garment falling within the specified tolerance does not automatically mean that its fit or overall quality is acceptable. The measurement result still needs to be considered alongside garment balance, appearance, construction, and the approved sample.
Measurement instructions should be checked during sample development, not left until final inspection. If the brand and manufacturer use different reference points, the resulting measurement reports may not be comparable.
Before bulk production, confirm that the approved documents include:
l A POM diagram showing the reference points and measuring paths.
l A measurement chart with target values, units, and agreed tolerances.
l The required garment condition and closure position for measurement.
l The approved sample and specification version used for production.
When a sample does not meet the specification, identify the affected POM and check the result against the approved measuring method. This helps distinguish a genuine pattern or construction issue from a measurement inconsistency. Measurement results should also be reviewed as part of garment sample approval before bulk production.
The same measurement method should then be used during bulk inspection. Consistent reference points give the brand and manufacturer a reliable basis for reviewing garment dimensions and deciding whether corrective action is needed.